Introduction
Managing emails efficiently is essential in any organization. If you frequently send emails to the same group of people, creating a Distribution List (DL) in Outlook 365 can save time and improve work productivity.
In this guide, you will learn:
- What a Distribution List is in Outlook 365
- The difference between Outlook Distribution Lists and Exchange Online Distribution Groups
- How to create a Distribution List in Outlook
- How to add members to a Distribution List
- How to create a Distribution List from an existing email
- How to send emails using a Distribution List
What Is a Distribution List in Outlook 365?
A Distribution List (DL), also known as a Contact Group, allows you to send an email to multiple recipients using a single group name instead of manually entering each email address every time.
For example, instead of adding ten email addresses in the To or CC field, you can create a Distribution List named Sales Team and send emails to all members by simply selecting that group.
Outlook Distribution List vs Exchange Online Distribution Group
Although both are used to send emails to multiple recipients, they operate differently.
Outlook Distribution List
- Created and managed directly within the Outlook application.
- Designed for personal use by individual users.
- Helps send emails to multiple recipients quickly.
- Stored locally in Outlook or within your mailbox contacts.
- Limited to the user who creates the group.
Exchange Online Distribution Group
- Created and managed at the server level in Exchange Online.
- Available to users across the organization.
- Can be managed through the Exchange Admin Center (EAC) or PowerShell.
- Supports advanced permissions and administrative controls.
- Suitable for organization-wide email communication.
Why Create a Distribution List in Outlook?
Creating a Distribution List offers several benefits:
- Saves time when sending emails to multiple recipients.
- Reduces the risk of missing recipients.
- Simplifies communication with teams, departments, or project groups.
- Improves productivity by eliminating repetitive typing of email addresses.
For example, if you regularly email your HR team, you can create a Distribution List named HR Team and send emails to all members with a single click.
How to Create a Distribution List in Outlook 365
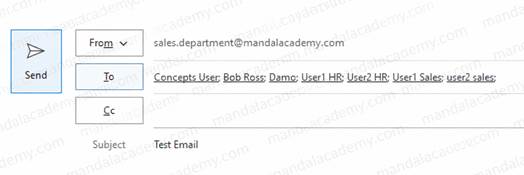
Follow the steps below to create a new Distribution List in Outlook.
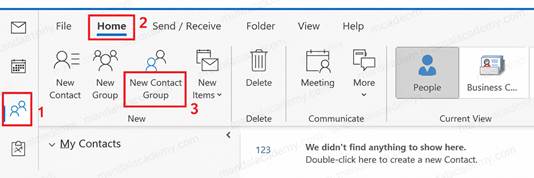
Step 1: Open Contacts in Outlook
- Open Microsoft Outlook.
- Select People or Contacts from the navigation pane.
- Ensure you are on the Home tab.
Step 2: Create a New Contact Group
- Click New Contact Group.
- A new Contact Group window will open.
Step 3: Name the Distribution List
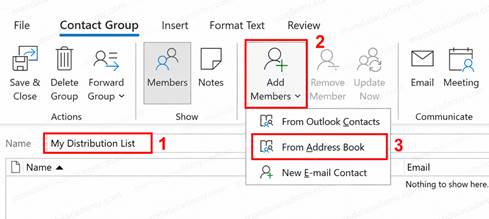
- Enter a meaningful name for your Distribution List.
- Example: Marketing Team
- Example: Project Members
- Example: HR Department
Step 4: Add Members
- Click Add Members.
- Select From Address Book.
- Double-click each user you want to add.
- Click OK.
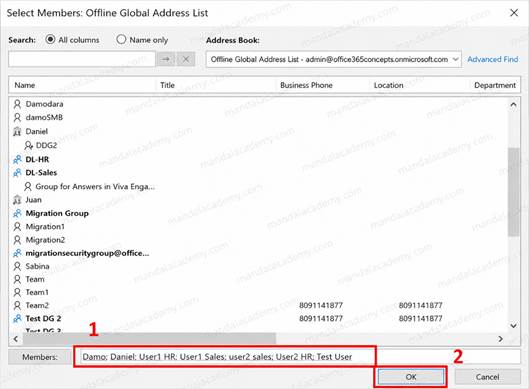
Step 5: Save the Distribution List
- Verify that all members are added.
- Click Save & Close.
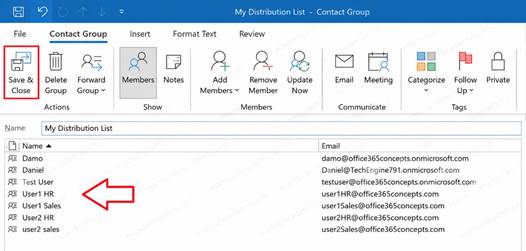
Your Outlook Distribution List is now ready to use.
How to Create a Distribution List from an Existing Email
If you frequently send emails to the same recipients, Outlook allows you to create a Distribution List directly from a previously sent email.
Step 1: Open a Previously Sent Email
- Navigate to the Sent Items folder.
- Open the email that contains all desired recipients.
- Copy the email addresses from the recipient list.
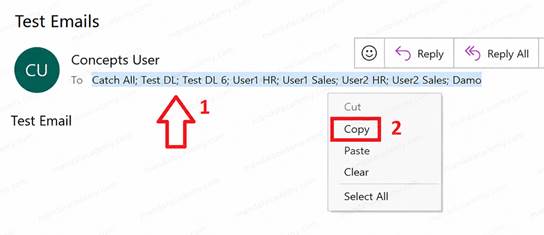
Step 2: Create a New Contact Group
- Go to People or Contacts.
- Select Home.
- Click New Contact Group.
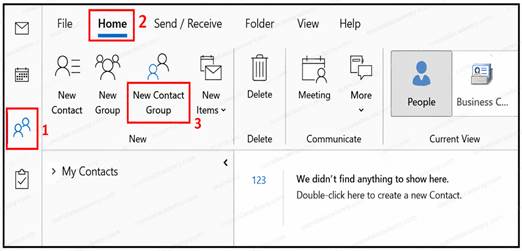
Step 3: Add Recipients
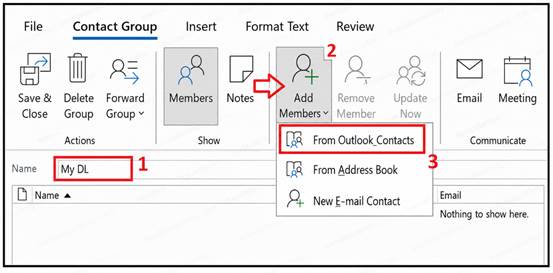
- Enter a name for the Distribution List.
- Click Add Members.
- Select From Outlook Contacts.
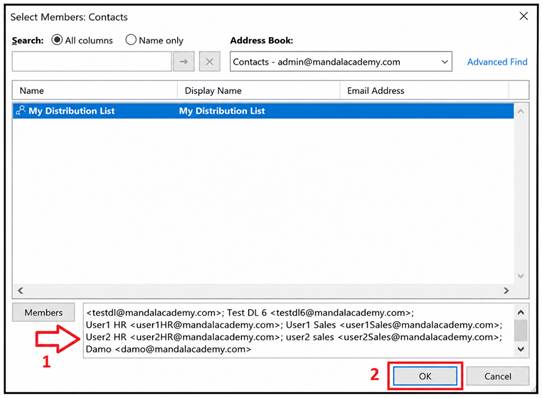
- Paste the copied email addresses into the Members field.
- Click OK.
Step 4: Save the Group
- Confirm that all recipients have been added.
- Click Save & Close.
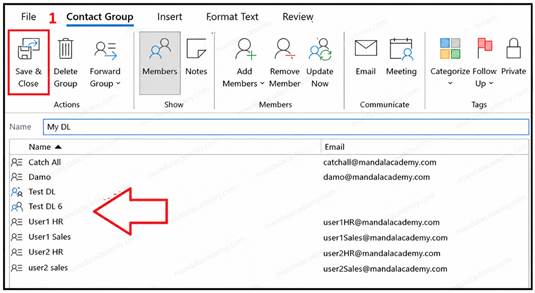
The new Distribution List is now available for future emails.
How to Send an Email Using a Distribution List in Outlook
Once your Distribution List is created, sending emails becomes much easier.
Step 1: Create a New Email
- Open Outlook.
- Click New Email.
Step 2: Add the Distribution List
- Enter the Distribution List name in the To, CC, or BCC field.
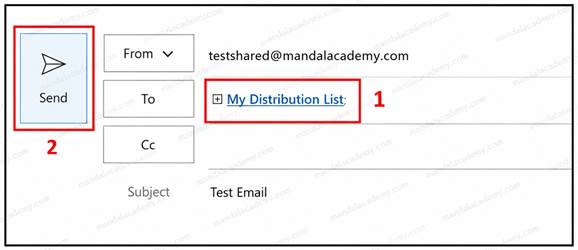
- Outlook will automatically resolve the group name.
Step 3: Send the Email
- Compose your message.
- Click Send.
The email will be delivered to all members included in the Distribution List.
How to View Members of a Distribution List
To see who is included in a Distribution List:
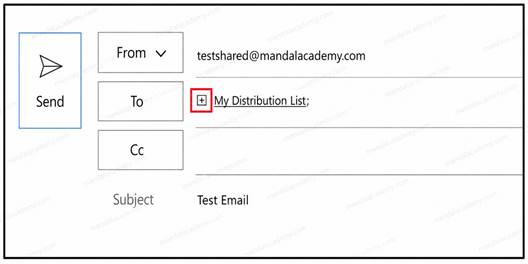
- Add the Distribution List to the email recipient field.
- Click the + (Expand List) icon next to the group name.
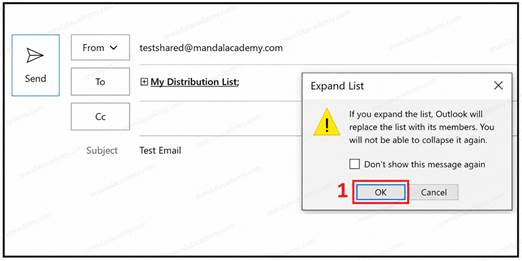
- Select OK when prompted.
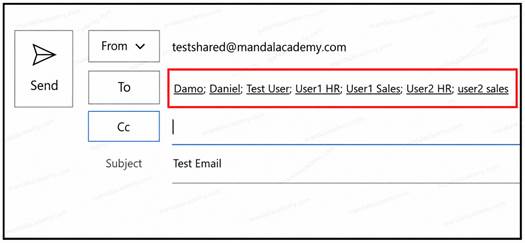
Outlook will display all members contained within the Distribution List.
Best Practices for Managing Distribution Lists
- Use clear and descriptive group names.
- Regularly update group membership.
- Remove inactive or outdated contacts.
- Create separate groups for different departments or projects.
- Test the group after creation to ensure emails are delivered correctly.
Frequently Asked Questions (FAQs)
Can I add external email addresses to an Outlook Distribution List?
Yes. Outlook Contact Groups can include both internal and external email addresses.
Can other users see my Outlook Distribution List?
No. Outlook Distribution Lists are typically personal and only available to the user who created them.
What is the difference between a Contact Group and a Distribution List?
In Outlook, Contact Group and Distribution List are often used interchangeably. Both serve the same purpose of grouping multiple recipients.
Can I edit a Distribution List after creating it?
Yes. Open the Contact Group, add or remove members as needed, and save the changes.
Is an Outlook Distribution List the same as a Microsoft 365 Group?
No. Microsoft 365 Groups provide additional collaboration features such as shared mailboxes, calendars, files, and Teams integration.
Conclusion
Creating a Distribution List in Outlook 365 is an effective way to simplify email communication and improve productivity. Whether you need to communicate with a small team, project members, or external contacts, Distribution Lists help you send emails to multiple recipients quickly and efficiently.
By following the steps in this guide, you can create, manage, and use Distribution Lists in Outlook with ease.
If you found this article helpful, share it with your colleagues and follow Mandal Academy for more Microsoft 365, Exchange Online, Outlook, and PowerShell tutorials.
Comments (0)
No comments yet. Be the first to leave one!