Office 365 Email Forwarding: Complete Guide for Outlook, OWA, Exchange Admin Center & PowerShell
What is Office 365 Email Forwarding?
Office 365 Email Forwarding allows users and administrators to automatically redirect incoming emails from one mailbox to another. This feature is commonly used when employees are on leave, when mailboxes are being migrated, or when multiple users need access to the same emails.
In Microsoft Exchange Online, email forwarding can be configured in several ways,
- Outlook Inbox Rules
- Outlook Web App (OWA) Inbox Rules
- OWA Email Forwarding
- Exchange Online Mailbox Forwarding (Admin Controlled)
- PowerShell Commands
This guide explains each method in detail.
1. Email Forwarding Using Outlook Inbox Rules
Users can create Outlook Inbox Rules to automatically forward incoming messages to another user.
Steps to Configure Outlook Email Forwarding
- Open Outlook Desktop Application.
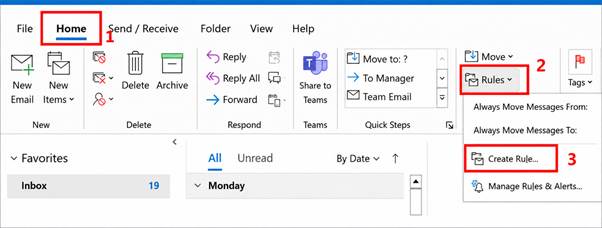
- Go to Home → Rules → Create Rule.
- Click Advanced Options.
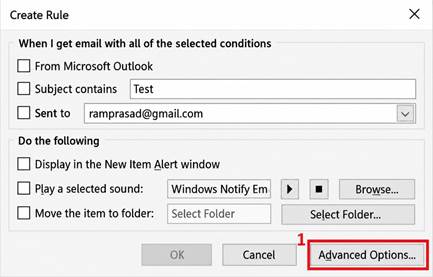
- Select the required condition (for example, Sent only to me).
- Click Next.
- Under Actions, select Forward it to people or public group.
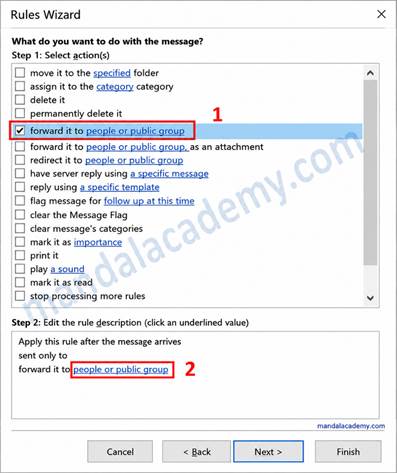
- Choose the recipient from the Global Address List (GAL).
- Click OK and then Next.
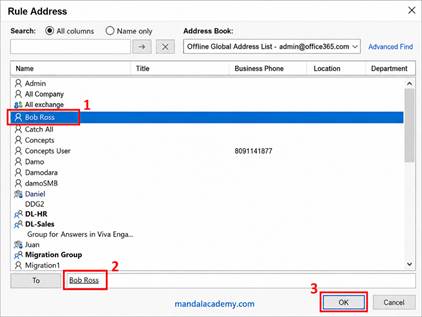
- Configure any exceptions if required.
- Select Run this rule now on messages already in Inbox (optional).
- Click Finish.
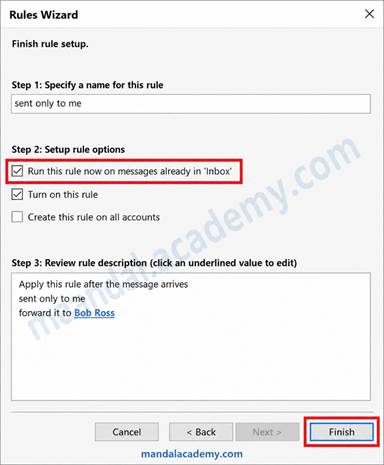
Benefits of Outlook Inbox Rules
- Easy to configure.
- Supports conditional forwarding.
- Can forward only specific emails.
2. Email Forwarding Using OWA Inbox Rules
Users can also create forwarding rules directly from Outlook on the Web (OWA).
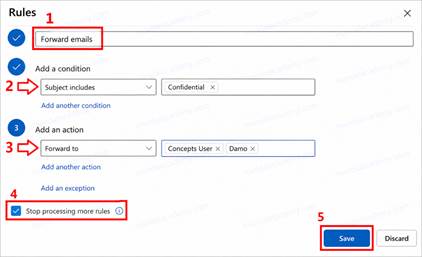
Steps to Configure OWA Inbox Rules
- Sign in to Outlook Web App (https://outlook.office.com).
- Click the Settings (Gear Icon).
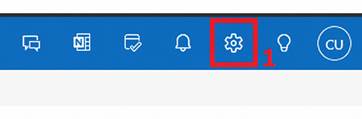
- Select Mail → Rules.
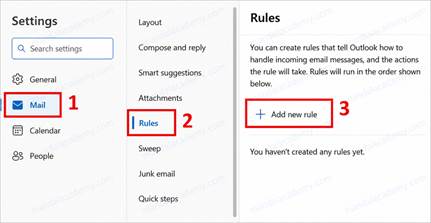
- Click Add New Rule.
- Enter a rule name.
- Choose a condition.
- Under Add an Action, select Forward To.
- Choose the recipient.
- Enable Stop Processing More Rules.
- Click Save.
Advantages
- No Outlook client required.
- Accessible from any browser.
- Supports advanced conditions.
3. Email Forwarding Using OWA Forwarding
OWA Forwarding is the simplest method for forwarding all incoming emails to another mailbox.
Steps to Enable OWA Forwarding
- Log in to Outlook on the Web (https://outlook.office.com).
- Click Settings.
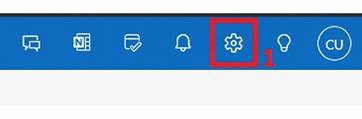
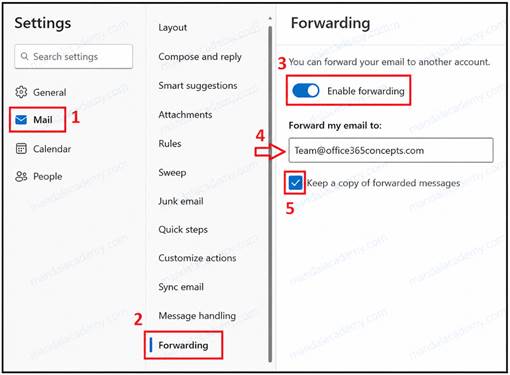
- Navigate to Mail → Forwarding.
- Enable Forwarding.
- Enter the destination email address.
- Select Keep a Copy of Forwarded Messages if required.
- Click Save.
Important Note
If Keep a Copy of Forwarded Messages is enabled, a copy of every forwarded email remains in the original mailbox. If disabled, emails are only delivered to the forwarding address.
4. Exchange Online Mailbox Forwarding (Admin Method)
Mailbox forwarding can also be configured by Exchange Administrators or Global Administrators through the Exchange Admin Center (EAC).
This method is commonly used for:
- Employee departures
- Shared mailbox management
- Temporary mailbox redirection
- Business continuity requirements
Enable Mailbox Forwarding in Exchange Admin Center
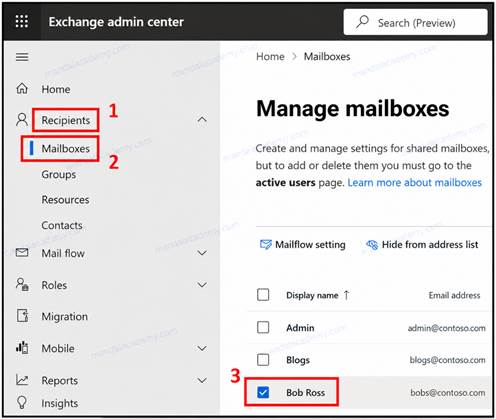
Step 1: Open Exchange Admin Center
Navigate to:
Recipients → Mailboxes
Select the mailbox that requires forwarding.
Step 2: Configure Email Forwarding
- Open mailbox properties.
- Select Email Forwarding.
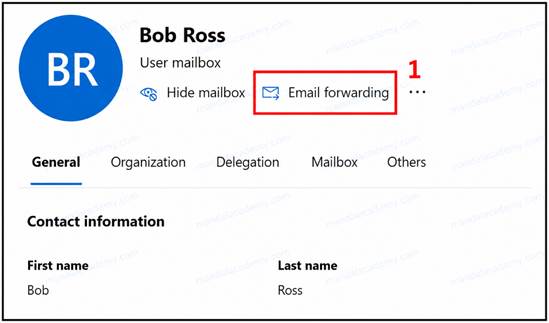
- Enable forwarding.
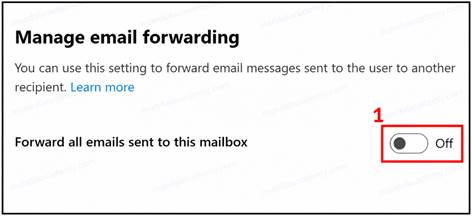
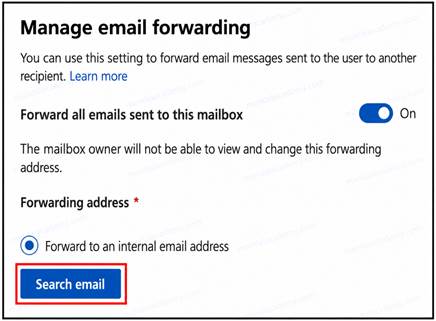
Forward to an Internal User
- Click Search Email.
- Select the internal recipient.
- Save the changes.
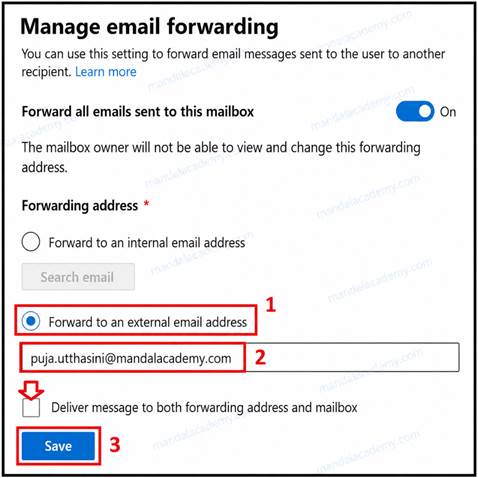
Forward to an External Email Address
- Select Forward to an External Email Address.
- Enter the external email address.
- Enable Deliver Messages to Both Forwarding Address and Mailbox if a copy should remain in the original mailbox.
- Click Save.
Managing Mailbox Forwarding Using PowerShell
PowerShell provides the most efficient way to manage mailbox forwarding in Exchange Online.
Connect to Exchange Online
Connect-ExchangeOnline
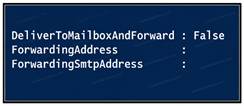
View Forwarding Configuration for a Single Mailbox
Get-Mailbox ramprasad@mandalacademy.com | FL DeliverToMailboxAndForward,ForwardingAddress,ForwardingSmtpAddress
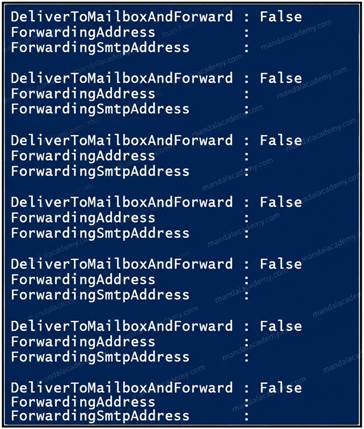
View Forwarding Configuration for All Mailboxes
Get-Mailbox -ResultSize Unlimited | FL DeliverToMailboxAndForward,ForwardingAddress,ForwardingSmtpAddress
Find All Mailboxes with Forwarding Enabled
Get-Mailbox | Where {$_.ForwardingsmtpAddress -ne $Null} | Select Name, ForwardingAddress,ForwardingSmtpAddress,DeliverToMailboxAndForward
Forward Email to Internal Recipient and Keep a Copy
Set-Mailbox ramprasad@mandalacademy.com -ForwardingAddress Team@domain.com -DeliverToMailboxAndForward $True
Forward Email to Internal Recipient Without Keeping a Copy
Set-Mailbox ramprasad@mandalacademy.com -ForwardingAddress name@domain.com -DeliverToMailboxAndForward $False
Forward Email to External Recipient and Keep a Copy
Set-Mailbox ramprasad@mandalacademy.com -ForwardingSmtpAddress externaluser@gmail.com -DeliverToMailboxAndForward $True
Forward Email to External Recipient Without Keeping a Copy
Set-Mailbox ramprasad@mandalacademy.com -ForwardingSmtpAddress externaluser@gmail.com -DeliverToMailboxAndForward $False
How to Identify the Type of Email Forwarding
Exchange Online administrators can determine how an email was forwarded by analyzing the email message headers.
Inbox Rule Forwarding
Look for:
X-MS-Exchange-Inbox-Rules-Loop
This indicates that the email was forwarded using an Outlook or OWA Inbox Rule.
Mailbox or OWA Forwarding
Look for:
X-MS-Exchange-ForwardingLoop
This indicates that the email was forwarded using OWA Forwarding or Exchange Mailbox Forwarding.
Best Practices for Office 365 Email Forwarding
- Regularly review forwarding settings.
- Monitor external forwarding to prevent data leakage.
- Use mailbox forwarding only when business requirements exist.
- Enable auditing for compliance tracking.
- Restrict automatic forwarding to external domains if required by company policy.
Conclusion
Office 365 provides multiple ways to forward emails in Exchange Online. End users can use Outlook Rules, OWA Rules, or OWA Forwarding, while administrators can manage mailbox forwarding through the Exchange Admin Center or PowerShell.
Understanding these forwarding methods helps administrators maintain security, compliance, and efficient email management across the Microsoft 365 environment.
Comments (0)
No comments yet. Be the first to leave one!